Bought my first Car - Mitsubishi Lancer CK2 MX Touring :)

After lots of hard work I was lucky enough to buy my first car last week. I was searching and investigating lots of Cars! (well i m pretty sure i hv checked more than 50 cars engine started and bonnet opened xD) around Colombo area with a great deal of support from one of my uncle who is a a relation and a former Mechanic at Toyota Lanka.

And finally I decided to buy this charming (atleast for me xD) Lancer CK2 comes with the Evo5 bodykit installed to it. :)

Spec: http://specs.cars-directory.net/mitsubishi/lancer/1.5_MX_touring_11872.html


_____________

PS: Happened a lil accident near a three way junction at Bambalapit hit with a damned pizza motor bike :/ Front bumper, bonnet, 1 fog lamp, 1 signal lamp and 1 head lamp got damaged by this. Luckily I had setup a full insurance for my Car so got full claim for everything. But not to mention the big amount of time I had to spent in garages and insurance offices :/ it was a (sucking indeed) but a great experience after all ..


Never-mind! all is well back again. Here is a picture taken after the recovery :)

Google Summer of Code 2014: Here are some great info sources for Potential GSoC Aspirants!


We had a GSoC meetup at GdayK event (9th Nov'13 at Queens Hotel, Kandy) Here are the presentation resources we used at there: http://goo.gl/Z5lYIW

Hope this would be helpful for potential GSoC aspirants, Good luck!
 
-HTH, 
Harsha


GSoC Meetup Resources

  1.  Introduction Video about GSoC:  http://www.youtube.com/watch?v=OBUvf2q9vSc


  1. GSoC from A to Z - one of the coolest GSoC Presentations (Credits: Mr.Pradeeban) https://www.box.com/shared/c3b6d457360bfc8051bc


  1. Google Developers page of GSoC: https://developers.google.com/open-source/soc/


  1. GSoC 2014 Meetup resources: http://pastebin.com/ziHiLVXS


  1. Another really cool GSoC Presentation (Credits: Mr.Suranga) https://docs.google.com/file/d/0B0txED3K91sYZldyQlBnVEE1LTA/edit?usp=sharing


  1. Open source software for the world: Presentation (Credits: Mr.Keshan) https://docs.google.com/presentation/d/1G_1eOb9L46WCbC7ipbx4Ffc7RTqC3Rh812omSmOlvz4/edit?usp=sharing


  1. Getting involved with OpenMRS (one of the coolest orgs at GSoC) Presentation (Credits: Mr.Harsha) http://www.slideshare.net/harshadura/openmrs-getting-involved


End of Google Summer of Code thoughts, at OpenMRS!


TL;DR  Worked as a GSoC intern at OpenMRS and would love to thank all the people involved.


This years Google Summer of Code has drawn to an end. I worked on the Patient Narratives Upload project under the mentor-ship of Saptarshi Purkayastha.

And.. I am really glad to announce the Initial release of "Patient Narratives Module" ! :-)

Project in brief: The ultimate goal of this project is to build a OpenMRS based User-driven-Health-care system (with this module installed on top of OpenMRS-core)
By enabling care-seekers to connect with care-givers in which their current treatment can be reviewed by a group of care-givers, who can suggest further action.


I had some serious fun this summer.

Got involved with various technologies. including SpringAOP, DWR, WebRTC, Xuggle and dug up more into OpenMRS framework + with Form entry and Xforms module implementations.

Made a demo video, documented a lot about the project on the wiki and wrote a lot of code !
Did a presentation at OpenMRS Developer forum about the project.

I’d love to thank my mentor Saptarshi Purkayastha, Daniel Kayiwa, Mark Goodrich and OpenMRS community in general for all the amazing guidance that has been giving us throughout the summer.

We had loads of discussions on #openmrs IRC about development, do’s and don’ts in our implementation, pros and cons of implementing a certain thing in a certain way. I was able to complete the core functionality and add support for commonly used features.

Although this formally concludes the Google Summer of Code’13 part, this is in no way the end. There are a lot more things in the project that have to be done. I’ll be helping to maintain the project along with adding functionality to it..

May the blessings of Lord Buddha be with us. නමෝ බුද්ධාය.

Remote debugging J2EE Application with Tomcat/Jetty and IntelliJ IDEA


Debug with Tomcat

Start tomcat with this command: catalina.sh jpda start

(if you do a "tail -100f catalina.out" it should display something like this at the bottom: "Listening for transport dt_socket at address: 8000")  

>> thats it! now goto step (2) to config IntelliJ

Debug with Jetty

B.1. Add maven options property inside your bash profile.

export MAVEN_OPTS="-XX:+CMSClassUnloadingEnabled -XX:PermSize=512M -XX:MaxPermSize=1024M -Xdebug -Xrunjdwp:transport=dt_socket,server=y,suspend=n,address=8000"

B.2. Save and source: source ~/.bashrc

B.3. Then Run jetty as usual in your web app: mvn jetty:run

(Now you should see something like this at the bottom of jetty log: "Listening for transport dt_socket at address: 8000")

>> thats it! now goto step (2) to config IntelliJ
------------------

2. Inside IntelliJ: Run -> Edit config -> Click (+) sign -> choose Remote -> give the host and debug port (default port of tomcat is 8000/for jetty use the port you used) -> Click OK


!! Thats all!

3. Now put some debug points inside the webapp.

4. Run -> Click Debug

now the Debugger will get connected with JVM. you will see a message saying "Connected to the target VM, address: 'localhost:8000', transport: 'socket'" yes thats it!

Now just browse your webapp as you normally do. IntelliJ will hit the debugger when you reach the debug point which you put earlier at the web app code.
(You will notice the browser is not responding when the Debugger hit some debug point.)


Notes: Don't forget to use the same source code you used to deploy the webapp. i mean WAR package should be a deployed output package of the relevant source code you gonna debug with. If its not crazy things will happen of course. ;-)


Sample Java/Maven Web project which allows to simply send SMS using Twilio API

Twilio-SMS-test

Download project: https://github.com/harshadura/Twilio-SMS-test/archive/master.zip

Require: Java, Maven

Maven project: simply use =) mvn clean install jetty:run

Web app will start on: http://localhost:8085/twilio-web-test/

Pre-Built war can be found at: DemoWAR folder.

Screenshot: >>


"Story of the Floss" -- About a great life phrase


Yesterday at the discussion with my mentor Saptarshi, he mentioned a really nice phrase called "Story of the Floss" I studied more about it. Its a really great phrase and can learn lots of thing from it.

Simply it means: Keep it simple, Build an End to End solution, Most importantly take action(code) without thinking/talking too much and adding more and more fancy ideas into the problem.

Here's the related story. (Reference: https://wiki.openmrs.org/display/RES/The+Story+of+the+Floss)


Clem and another group are faced with the same challenge: build a bridge across a canyon.

The other group — like most of us would — gathers engineers, draws up specifications, and begins planning on how the bridge should be constructed properly.  Meanwhile, Clem pulls a box of dental floss out of his pocket, unwinds it, and throws it across the canyon. Almost immediately, he's got something across the canyon. It's only floss, but it's there — end to end.

The other group is arguing about whether the bridge should be a beam, suspension, truss, or arch bridge.  Clem starts layering paper mâché onto the floss.

The other group has finally decided on a suspension bridge and begins preparing the materials according to specifications.  Clem has people walking across his paper mâché bridge.

The other group realizes that they would probably be better off with a truss bridge, begins discussions on the new specifications, and then realizes that they are too far over budget and the project is shut down.  Clem has people driving across his bridge.

The other group finally creates their version of the bridge, only to realize it doesn't reach over to the other side where they initially intended it to!


The Lesson

Whenever possible, start with the floss. See the solution through end-to-end, since this is often the best way to understand the problem and often informs the next pass at the solution. In the end, it is rare that we fully understand the problem until the third iteration of the solution.
Be agile, open to corrections, and iterate on your solutions. But, most importantly, take action.
  

My Thoughts

In my words the lesson of this story is dont try to be so smart and keep expanding the idea of your project. Just start simply from sctratch and add lil by lil, But the goal should be to develop an end to end solution (that means a product which is something useful and usable in a practical scenario.) After getting accomplish the basic goals of the project you can proceed into your other fancy ideas. Note that those fancy ideas could take a longer time to develop (or might get failed) but if you have followed the floss way, you still have a basic product which is really a usable one!

Actually I think this phrase isn't only related to the open source software development, This is a truly awesome phrase which we can adopt in our life in general!


OpenShift Gear quick links


SSH into Open-Shift instances:

https://www.openshift.com/blogs/access-your-application-gear-using-ssh-with-putty

How to deploy WAR files inside Open-Shift:

http://whyjava.wordpress.com/2012/11/25/deploy-war-on-tomcat-running-on-openshift/

How to restart Open-Shift without Git pushes: 

ctl_app  : control your application (start, stop, restart, etc)
https://www.openshift.com/kb/kb-e1055-how-to-restart-an-application


[Tutorial] Simple Android Application which consumes C# ASP.net Web service


Whoever getting started to learn Web services - Android app interaction I hope this tutorial may be helpful, You can download the full source from here: https://github.com/harshadura/RDA-Android-ASP.WS-interact/archive/master.zip

Prerequisites: 
.NET framework, SQL server 2008, Android device/emulator
 
How to run.

  1. Attach the MDF file into your SQL server.
  2. Change the connection string at the C# project config according to your db connection.
  3. Change the 'Web service URL' on the Android Application.
Notes:
  1. You will need to use WIFI tether to get connect your device with PC/otherwise you will need a router, both connected into it.
  2. Sometimes you will need to configure the security restrictions of your IIS web server to get connect the device.

C# Web Service

using System;
using System.Collections.Generic;
using System.Linq;
using System.Web;
using System.Web.Services;
using System.Data;
using System.Data.Sql;
using System.Data.SqlClient;

[WebService(Namespace = "http://tempuri.org/")]
[WebServiceBinding(ConformsTo = WsiProfiles.BasicProfile1_1)] 
public class Service : System.Web.Services.WebService
{
    public Service () {

        //Uncomment the following line if using designed components 
        //InitializeComponent(); 
    }

    [WebMethod]
    public String GetEmployeeByID(String id) {
          
            DataSet2TableAdapters.EmployeeTableAdapter dt1 = new DataSet2TableAdapters.EmployeeTableAdapter();
            String ename = "" + dt1.getEmpByID(id);
            return ename;
    }

    [WebMethod]
    public Employee[] GetEmployees()
    {
        var employees = new List();

        try
        {
            string connect = @"Data Source=HARSHADURA-AZUS\SQLEXPRESS;Initial Catalog=RDA;Integrated Security=True";
            string query = "SELECT eid, ename FROM Employee";

                SqlConnection thisConnection = new SqlConnection(connect);
                thisConnection.Open();
                SqlCommand thisCommand = thisConnection.CreateCommand();
                thisCommand.CommandText = query;
                SqlDataReader thisReader = thisCommand.ExecuteReader();
                while (thisReader.Read())
                {
                    var emp = new Employee();
                    emp.eid = thisReader["eid"].ToString();
                    emp.ename = thisReader["ename"].ToString();
                    employees.Add(emp);
                }
                thisReader.Close();
                thisConnection.Close();
            }
            catch (SqlException e)
            {
                Console.WriteLine(e.Message);
            }
        return employees.ToArray();
    }
}


Android --SOAP Client

 private SoapObject result = null;

 private static String SOAP_ACTION = "http://tempuri.org/GetEmployeeByID";
 private static String NAMESPACE = "http://tempuri.org/";
 private static String METHOD_NAME = "GetEmployeeByID";
 private static String URL = "http://192.168.123.100:8080/Service.asmx?WSDL";

 public void connectSOAP(String empid) {
  SoapObject request = new SoapObject(NAMESPACE, METHOD_NAME);
  request.addProperty("id", empid);

  SoapSerializationEnvelope envelope = new SoapSerializationEnvelope(
    SoapEnvelope.VER11);
  envelope.dotNet = true;
  envelope.setOutputSoapObject(request);
  HttpTransportSE androidHttpTransport = new HttpTransportSE(URL);
  try {
   androidHttpTransport.call(SOAP_ACTION, envelope);
  } catch (Exception e) {
   e.printStackTrace();
  }

  result = (SoapObject) envelope.bodyIn;
  
 }

Google Summer of Code 2013.. I am IN for the second time!!


So Glad to heard that I have been selected for "Google summer of code 2013" as a Student this year again, yeap for the second time! :-) This year it was very amazing and much more competitive than last year. To mention a lil wow fact: I have been selected for *two* open source organizations this time!! In-fact those are two great organizations:"Raxa" and "OpenMRS" both are related to Healthcare informatics. (Sometimes we need to take some crucial decisions in our life.) So finally I chose OpenMRS as my organization, because of my love towards this awesome open source community which I have been with over year now,
And ripen, I love this concept by now, "Write codes, Save lives!" I dont think we (as coders) can do much better work than this to serve the global healthcare informatics force. Saving human lives is a priority among all other alms-giving stuff. 

Lastly I wanna thank Lord Budhdha who were always blessed me to get through this big achievement! නමෝ බුද්ධාය.

Congratz everyone! Looking forward for a great summer with OpenMRS!

If you are interested, My Project details can be found here:
I will be developing a "User-driven healthcare" system by integrating OpenMRS-core as the base.

1) https://google-melange.appspot.com/gsoc/project/google/gsoc2013/durapix/118001
2) https://wiki.openmrs.org/display/projects/Patient+Narratives+Upload+-+Project+Proposal


Few Links:
OpenMRS GSoC 2013 students list: https://wiki.openmrs.org/display/RES/Summer+Of+Code+2013#SummerOfCode2013-Interns,Mentors,andProjects

GSoC 2013 Accept students at Google Melange web: https://google-melange.appspot.com/gsoc/projects/list/google/gsoc2013


Weekend Raspberry-Pi experiments!


Raspberry PI is an awesome mini Linux Computer. I was totally amazed with the computing power it bears and the inbuilt GPIO pins make it even more awesome! I am pretty sure this cute lil linux box opens unlimited possibilities for a creative tech person because of this Computing and Electronics prototyping features it bears. So thats it a lil intro about RasPi and here we go, my 1st project using it! xD

I have used Raspbian Wheezy Linux distro installed to my Sandisk SDHC 8GB class 10 microSD card. My monitor has no HDMI port, So I had to use home Sony TV for it. Plugged everything, powered on, And booyah!the PI booted successfully!

Small issue was noticed after few mins, its only about colors! the colors were only black and white. So I googled about it and found that some TVs display like this and i need to edit a conf at PI O/S. If you need more info can be found here: (Simply the fix is change to: "sdtvmode=2" at "/boot/config.txt" file, and do a sudo reboot, Voila! colors will come up!)


Despite blinking LEDs xD I have tried a new tutorial to stream video from a Web Cam attached to PI to Web server, So the video stream can be accessed by the LAN network. I have used my router for this connected to PI.


RaspberryPI is awesome for electronics-computer-mobile combinated projects. And while surfing I found theirs another product called beagle board similar to RaspberyPI. : http://beagleboard.org/
Since the highly marketing strategies of RasPI we dont aware much about this gadget, But I think it can do more stuff than RasPI though the cost it lil bit larger. RaspPi is 35$ and BeagleBrd is 89$ A nice comparison between both those two credit card size Linux Computers can be found here:

And finally i wanna thank my friend "Harsha Kumara" who provided me his awesome gadget to play with it for couple of days! Thanks harsha!

Playing with GPIO!


Let's start with the first method (File System):

*Before starting startx
Use SuperUser (After every reboot) or use sudo before any command
sudo su

Connect an LED using a resistor between GPIO11 and GND.

Creating a File access to GPIO using console commands:

If you write to the ./export file in the /sys/class/gpio/ subdirectory, the system creates a file with a GPIO structure according to the input. In this case we want to create an access to write directly to GPIO11 in order to handle an LED.

Create a GPIO file access:
echo 11 > /sys/class/gpio/export 

Configure the Pin Direction (In/Out):
echo out > /sys/class/gpio/gpio11/direction

Write a value to turn on the LED using the GPIO11:
echo 1 > /sys/class/gpio/gpio11/value

Now your led should be ON!!!

Write a value to clear the LED using the GPIO11
echo 0 > /sys/class/gpio/gpio11/value

Now your led should be OFF!!!

Delete the created GPIO (11)
echo 11 > /sys/class/gpio/unexport
 
Ref: https://sites.google.com/site/semilleroadt/raspberry-pi-tutorials/gpio


lil guide on RasPI


lil guide on Beagle Bone/Board


Links:

Login using Remote Desktop to Raspberry PI: http://forum.xda-developers.com/showthread.php?t=2119786
Raspberry Pi Hardware Overview, Documentation, and Research
http://forum.xda-developers.com/showthread.php?t=1945778

Raspberry Pi Supercomputer


Arduino to PC/Android -- 2 way serial connection via Bluetooth (using a cheap BT module) :-)


Finally i was able to blink a LED on my Arduino through an Android app. Well! it was a really glad moment for me. :-D


I have used a cheap Bluetooth module called RS232 BT Module even you could use this one as well.

 
Note that TX of BT module need to connect with Arduino's RX
And RX of BT module with Arduino's TX, I have wasted few hours to figure out this mistake :-D

BT-RX >> Ard-TX
BT-TX >> Ard-RX


Notes:
On bluetooth, Pair them-- default password is: 1234
My BT device name was recognized as : "Linode"

Tutorials I followed:
1. http://www.instructables.com/id/Cheap-2-Way-Bluetooth-Connection-Between-Arduino-a/
2. http://www.instructables.com/id/Androino-Talk-with-an-Arduino-from-your-Android-d/step2/Setup-the-Arduino-hardware/
3. http://english.cxem.net/arduino/arduino4.php


Software Licensing facts (Open Source/Proprietary)


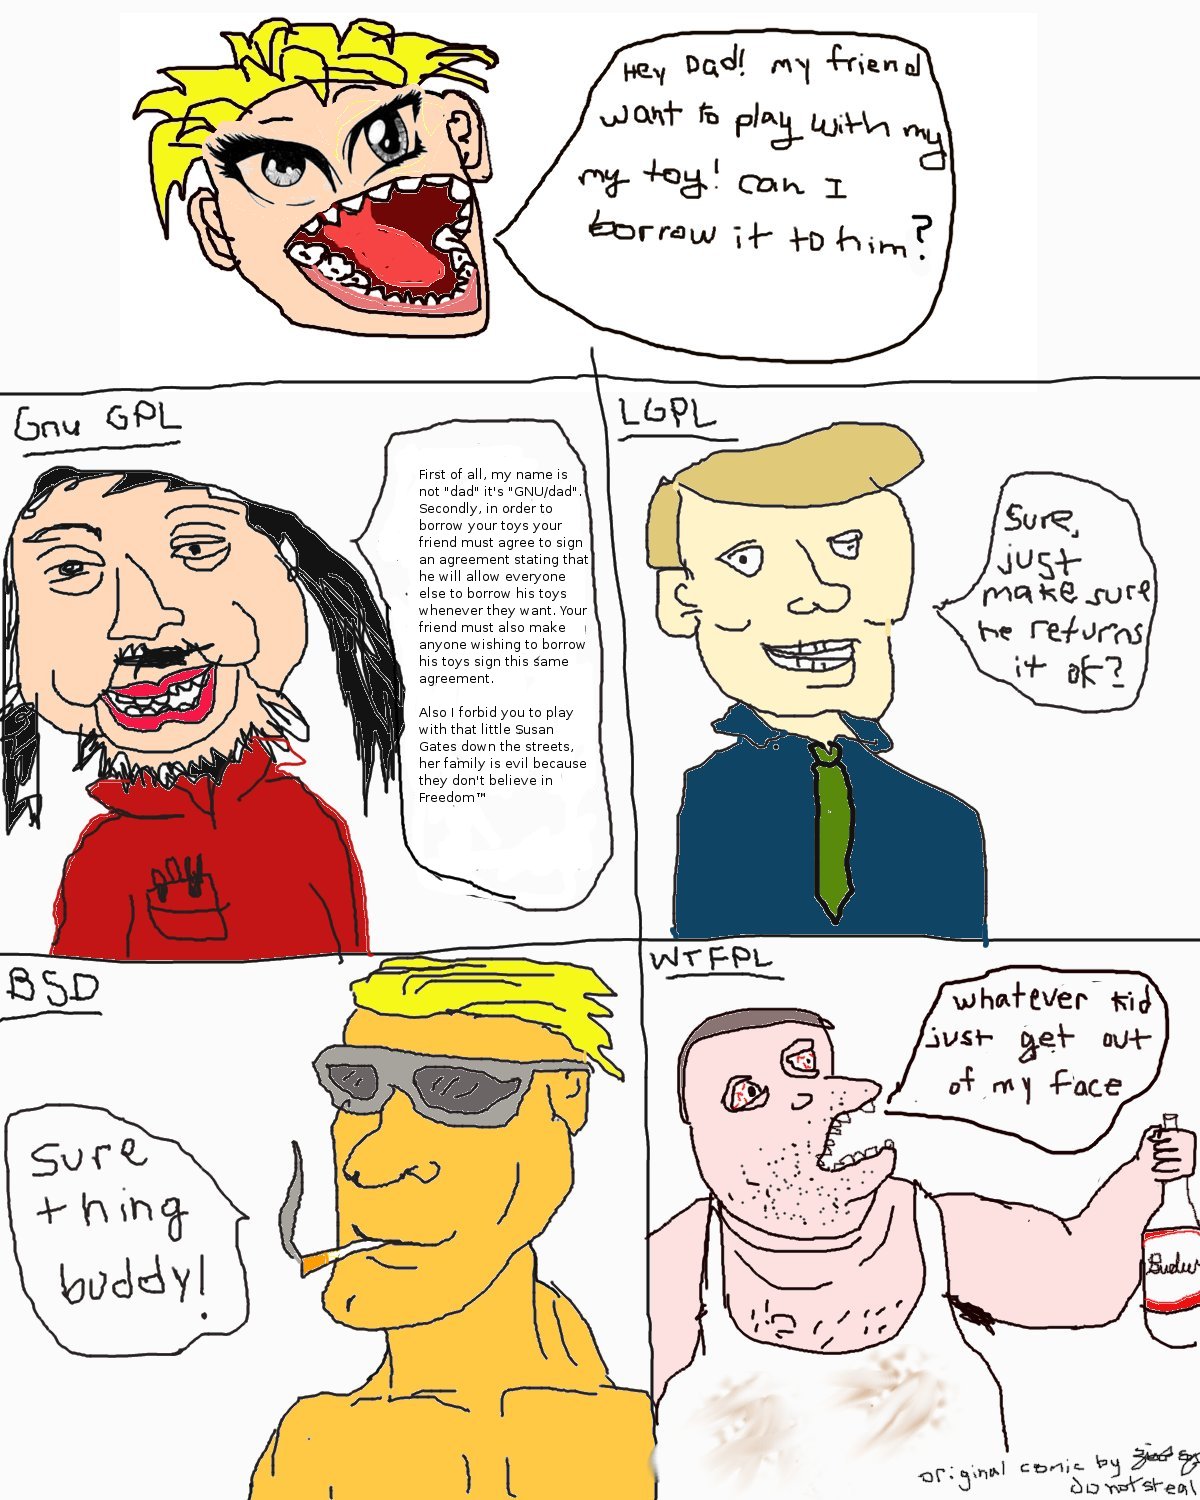
There are three main families of free software licenses:
> permissive, weak copyleft and strong copyleft.

Permissive licenses (MIT, BSD and Apache in your list) allow use of your code in proprietary projects without sharing back either their code or your code, if they modified it.

Weak copyleft licenses (LGPL, MPL in your list) allow use of your code in proprietary projects, but they should share back your code under the same license if they modified it.

Strong copyleft licenses (GPL) require that they distribute their own code under the same license (GPL here).


Free and Open Source software doesnt need to be distrbuted for Free
Understand the concept like this: Think of “free speech”, not “free beer” ("Free" means "Freedom" not "Zero Cost")

The word “free” has two legitimate general meanings; it can refer either to freedom or to price. When we speak of “free software”, we're talking about freedom, not price. (Think of “free speech”, not “free beer”.) Specifically, it means that a user is free to run the program, change the program, and redistribute the program with or without changes.

References:

  1. http://stackoverflow.com/questions/2700069/which-is-the-best-license-for-my-open-source-project
  2. http://www.gnu.org/philosophy/selling.html.en


My Open source Electronics hack with TechDuino (which is a clone of Arduino)


Since long time I was looking to buy a Arduino board but because of its bit of expensiveness I wasn't able to get it. But recently I got to know about TechDuino which is a exact derrivative clone of ArduinoUno board. The cost was also nice (LKR 1550) So I quickly went ahead and bought a one. I am so glad about this product and I would say its the "exact clone" of ArduinoUNO board! Quality wise this could be lil bit lower than orginal ArduinoUNO but who cares the quality we only need to get done our work! Thats it right? This is awesome. I wanna say thank you very much and kudos for the TechKatha team (plus Kalinga ayya) who have worked hard to make this electronic gadget.

Well.. here we go.. My TechDuino is shown below.. :-)

TechDuino


ArduinoUNO


Parts of Techduino


Parts of ArduinoUNO

You will need to download drivers and the ArduinoIDE to connect this with computer and program the IC.

On windows there's proper drivers. But on my ArchLinux box I got few problems to get up and running with TechDuino. So here's a workaround to it.
Greyed Serial Port Menu in Arduino IDE on Arch Linux: http://code.synchroverge.com/?p=99

Still I am trying to figure out the Arduino programming language (Blinked the LED and tried few crazy LED blinking programs :-D And I believe sky is the limit for this tiny lil electronics prototyping board for a enthusiastic person..cause its powered with TONS of features.

LED Blink Program

/*
  Blink
  Turns on an LED on for one second, then off for one second, repeatedly.
 
  This example code is in the public domain.
 */
 
// Pin 13 has an LED connected on most Arduino boards.
// give it a name:
int led = 13;

// the setup routine runs once when you press reset:
void setup() {               
  // initialize the digital pin as an output.
  pinMode(led, OUTPUT);    
}

// the loop routine runs over and over again forever:
void loop() {
  digitalWrite(led, HIGH);   // turn the LED on (HIGH is the voltage level)
  delay(100);               // wait for a second
  digitalWrite(led, LOW);    // turn the LED off by making the voltage LOW
  delay(100);               // wait for a second
}


Arduino Video Tutorial
Get to know your Tools with Arduino CEO Massimo Banzi 


How to RUN a much heavier Java web app top-of AWS EC2 Micro-Instance for almost FREE :-)


 *for DEMO purpose only (not suitable for production)


Amazon EC2 provides Free tire for Micro instances (which is a totally awesome almost free service), So thats a very cheap way to host Java Web App and checkout online! However the some biggie web apps seems like little bit heavier to tolerate on AWS micro instance (with 613MB of RAM) under default configurations. But there's a workaround to make it happen, by adding some more swap space (1GB) to Linux system. Follow the instructions here: https://forums.aws.amazon.com/thread.jspa?messageID=221044


After that do these stuff as well for more safety! (to get rid of: java.lang.OutOfMemoryError: PermGen space issue)
http://www.mkyong.com/tomcat/tomcat-javalangoutofmemoryerror-permgen-space/


Halo 4 is not for PC, dont get caught for FAKE torrents and Downloads!!


This Torrent gave me damn damn shit two times! yeah its more than 4GB twice = 8GB gone vain! F*** the uploader!!! After the fucking torrent download you will see a "Readme" file on it. Inside you can see a workout you need to get the actually WinRAR pass!! I hate to say, but it took me more than 2-3 hours to do that survey because of that shitty web site with lot of bugs. Finally i got it! yeah i thought all the mess was over, but its not! when i was giving the pass when the RAR promomt me to provide the pass it says password is incorrect!! ohh shit CORRECT password also incorrect, damn this person who have uploaded this shit!

FAKE >>>> http://games.torrentsnack.com/halo-4-pc/

And finally i seek more Halo4PC torrents, and I got to know the "First things First"
There's nothing called Halo4 for PC its only for Xbox, if someone says Halo4 for PC thats fake, fucking some other shit inside on those downloads, so dont waste your time, if you really want to play Halo 4 you need to take a Xbox! well yes thats all, hope this will help for some one, I thought to writeup this cause I know how pain is to download this kind of big torrent and seeing a crappy output.

Regards,
Harsha


Installing ArchLinux, Enable Sinhala unicode support and few Troubleshoot notes


After big effort recently i got installed ArchLinux on my Desktop PC. Now its up and running nicely with the KDE desktop environment.

I will describe here few stuff and problems that I faced during the Arch Setup on my real hardware, but i prefer who are interested to try it out on a Virtual machine first! 

This guide helped me alot, its a funny tutorial but all up to the points!

Video Tutorial


Troubleshooting 

few Notes encounter when I was installing Arch on real hardware/OracleVirtualBox

Internet not working after Installing the base system (after you restart)
Thats the effects of 
'systemctl enable dhcpcd@eth0.service' command

Regardless, the correct command now is:
systemctl enable dhcpcd.service


 http://www.youtube.com/watch?v=TBrbS5f8rnM

Configuring pacman

The SigLevel option in /etc/pacman.conf determines how much trust is required to install a package.

If you get some problem like:
error:

open pacman conf and edit
SigLevel = PackageRequired >> SigLevel = Never

Guide to install Sinhala Unicode Font

Download and Install lklug.ttf Sinhala Unicode font file
sudo pacman -S wget
sudo wget -P /usr/share/fonts http://sinhala.sourceforge.net/files/lklug.ttf
Then Run the following command
fc-cache -fv
And proceed to the below steps..

Enabling Sinhala Locale

Edit /etc/locale.gen. Uncomment following line
si_LK UTF-8
Run following program
locale-gen
Immediately you'll be able to read Sinhala Unicode in your programs (If not You may need to restart the relavent programs. eg: Firefox)


Google Summer of Code Meetup held at Colombo, Sri Lanka


We held our first Google Summer of Code meetup at Sri Lanka Institute of Information Technology (Colombo, Sri Lanka) on the 4th of March 2013. The event was organized with a great support from the Department of Computing. Approximately 150 young enthusiasts took part in the event. 


The first speaker was Keshan Sodimana, who is the Manager of Google Developer Group, Sri Lanka. Keshan delivered an excellent presentation on the value of Open source software for the world. 


I took the stage next to present students with an overview of the Google Summer of Code program.  I also focussed on general open source fundamentals from communication within open source communities to proper email/IRC etiquette and open source culture. 


The final speaker was Suranga Nath Kasthurirathne, a mentor and past GSoC student for OpenMRS. Suranga discussed general information about Google Summer of Code such as important dates for the program, how to apply, guidelines on how to write project proposals, and how to come up with the most suitable project per student. 


The program was concluded with a session on related technologies. This included an OpenMRS demonstration as well as other related tools which would help students to come to grips with GSoC 2013.


The students were very excited about the program, and asked many questions both publicly and individually after the session ended. We tried to clear up doubts they had about their own abilities, and encouraged them to participate. 


We also pointed out the benefits of working on real-life projects, as opposed to the mock projects that they work on in university. We also explained the value of building connections all around the world, and the spiritual happiness open source projects brings in general. Those of us who had participated as students with Google Summer of Code shared our experiences on why it was important to continue with a project after GSoC was over, and what benefits it could bring you.

Good luck for all the hopefuls applying for Google Summer of Code this year. May the most determined win!

By. Harsha Siriwardena, former Google Summer of Code student for OpenMRS 2012, Google Code-In mentor for the Fedora Project 2012 and Organizer of Google Developer Group Sri Lanka.

Received my Google Code-In Mentor T-Shirt!


Recently I received my "Google Code-In Mentor T-Shirt" from Google for mentoring students of the Fedora Project for GCI 2012 :-)


Glad to see this blog article written by one of my students at GCI 2012, At the period of Google Code-In, Apart of mentoring the student for the targeted GCI-TASKS I tried my best to teach the students basics of Open Source culture and awesomeness of contribute to an Open source project. Glad I saw most of the students have got the true mean of the Google Code In and Open Source software itself.


Harsha Siriwardena
Google Code-In Mentor for Fedora Project 2012

_____________________

Links
[1] Fedora Project GCI dashboard: http://www.google-melange.com/gci/org/google/gci2012/fedora
[2] http://fedoraproject.org/wiki/GCI_2012

Clone, Build and Run OpenMRS for the first time [A n00b Guide]


I have heard lot of issues from the people who are new to OpenMRS development. So thought to write my own guide. Most convenient way for me is using the Maven command line. No need of IDEs you can build and Run OpenMRS without any hassle.

These instructions will work within any platform regardless of the OS, You may need to configure the path variables first of all to use them on terminal. (How to Set Env. variables for Maven?)

Here are the simple steps.

Prerequisites: Apache Maven, JDK, MySQL server

1. First Clone the Git Repo: https://github.com/openmrs/openmrs-core

2. Navigate to the /<path>/openmrs-core/ directory using command line.
Fire > "mvn clean install"

You will need internet connection at this point. Cause maven will download all the required dependency jars from servers. First build will take a quite a lot of time depending on your Internet connection. In second time and so forth It will build really fast within few seconds. 

So dont worry about itAfter the first build to speed up the build process, you can use "mvn clean install -DskipTests"  command to skip the junit test cases. First time you need to build with test cases so you need to use the "mvn clean install" command.
 

3. Navigate to the /<path>/openmrs-core/webapp/ directory using command line.
Fire > "mvn jetty:run"

4. Now browse "localhost:8080/openmrs/" and you are done.

Really simple :-)

If you have come up this far you have already built the code and Ran OpenMRS system by yourself in your PC, Satisfied coder and ready to play with the code base. :-)

So IMHO After trying these steps try to import the project to Eclipse/IntelliJ and see.
Sometimes Eclipse gives crazy errors, (crashes, proxy, and lot etc) So OpenMRS starters tend to get demotivated by facing those little issues. We can blame Eclipse for it, Which is not a fault of OpenMRS code base :-D


Further Reading: https://wiki.openmrs.org/display/docs/Getting+Started+as+a+Developer

Hope this helps!

Regards,  
Harsha


Android app developed under 32bit -1.6JRE not working under 64bit-1.7JRE ? [QuickFix]


  1. Go to the project folder and right click on it -> properties -> check off the read only box and click ok
  2. Right-click on your project and select "Android Tools -> Fix Project Properties"
  3. Right-click on your project and select "Properties -> Java Compiler", check "Enable project specific settings" and select 1.5 or 1.6 from "Compiler compliance settings" select box. (try all the levels one by one just in case)
  4. Under Window -> Preferences -> Java -> Compiler, set Compiler compliance level to 1.6 or 1.5.
Hopefully it will settle the problem.

Link: http://stackoverflow.com/questions/7637144/android-requires-compiler-compliance-level-5-0-or-6-0-found-1-7-instead-plea